
Syndicate 101
Home › Forums › Previous Months › 57 – May 2021: Syndicate › Syndicate 101
- This topic has 4 replies, 2 voices, and was last updated 5 years, 1 month ago by
 Spoonboy.
-
April 28, 2021 at 1:32 pm #4408
Hi folks. Some elements of Syndicate can be confusing at first, so I thought I’d post some info that might be useful to those starting out. This isn’t a game-spoiling walkthrough, just some tips that should let you enjoy the game, and help minimise annoying restarts. Feel free to ask questions here or find me on the club irc; I’m there most days.
Firstly, this is the best site I’ve found for Syndicate resources and info. It covers all the original games and has everything you could need and more:
Missions are completed using groups of agents fitted with bodily upgrades and multiple weapons. These weapons/upgrades must all be researched and bought with the players income.
I recommend beginning research straight away. For weapon groups, it’s best to research in list order (Auto/Heavy/Assault/Misc). For mods, they’re all useful, but things like upgrading Chest and Legs early will help you not die and run away faster 😉
Spend enough that research is completed in a few days (usual duration of missions). No need to max out.
Research any new weapons/items found on dead enemies during missions. These can be used straightaway, but may fail and lose their ammo if they have not yet been researched. This is a good way to gain access to items before you’ve researched the relevant group.
Income:
Tax – Once you control a territory, you can tax the population. Higher taxes = unhappy population.
They could rebel (have to replay mission).
You must find a level they stay content at, while still giving you decent income 😉Weapon pickup/selling – $10k miniguns and $25k time bombs are best (don’t get blown up!). Click RMB on weapon to discard unwanted items, to free up space.
At the beginning of every mission, you will likely want to select all of your agents, to move/act as a group, or to all select the same weapon, etc. This is done with the “****” button in the middle of the agent icons at the top left of the screen. There is no hotkey for this (that I know of), and in some missions needs to be done very quickly at the start! So, learn this button’s position and how to select it quickly. The same button can be found in the pre-mission loadout/research screens, to be used in the same way.
April 28, 2021 at 1:34 pm #4409Drugs:
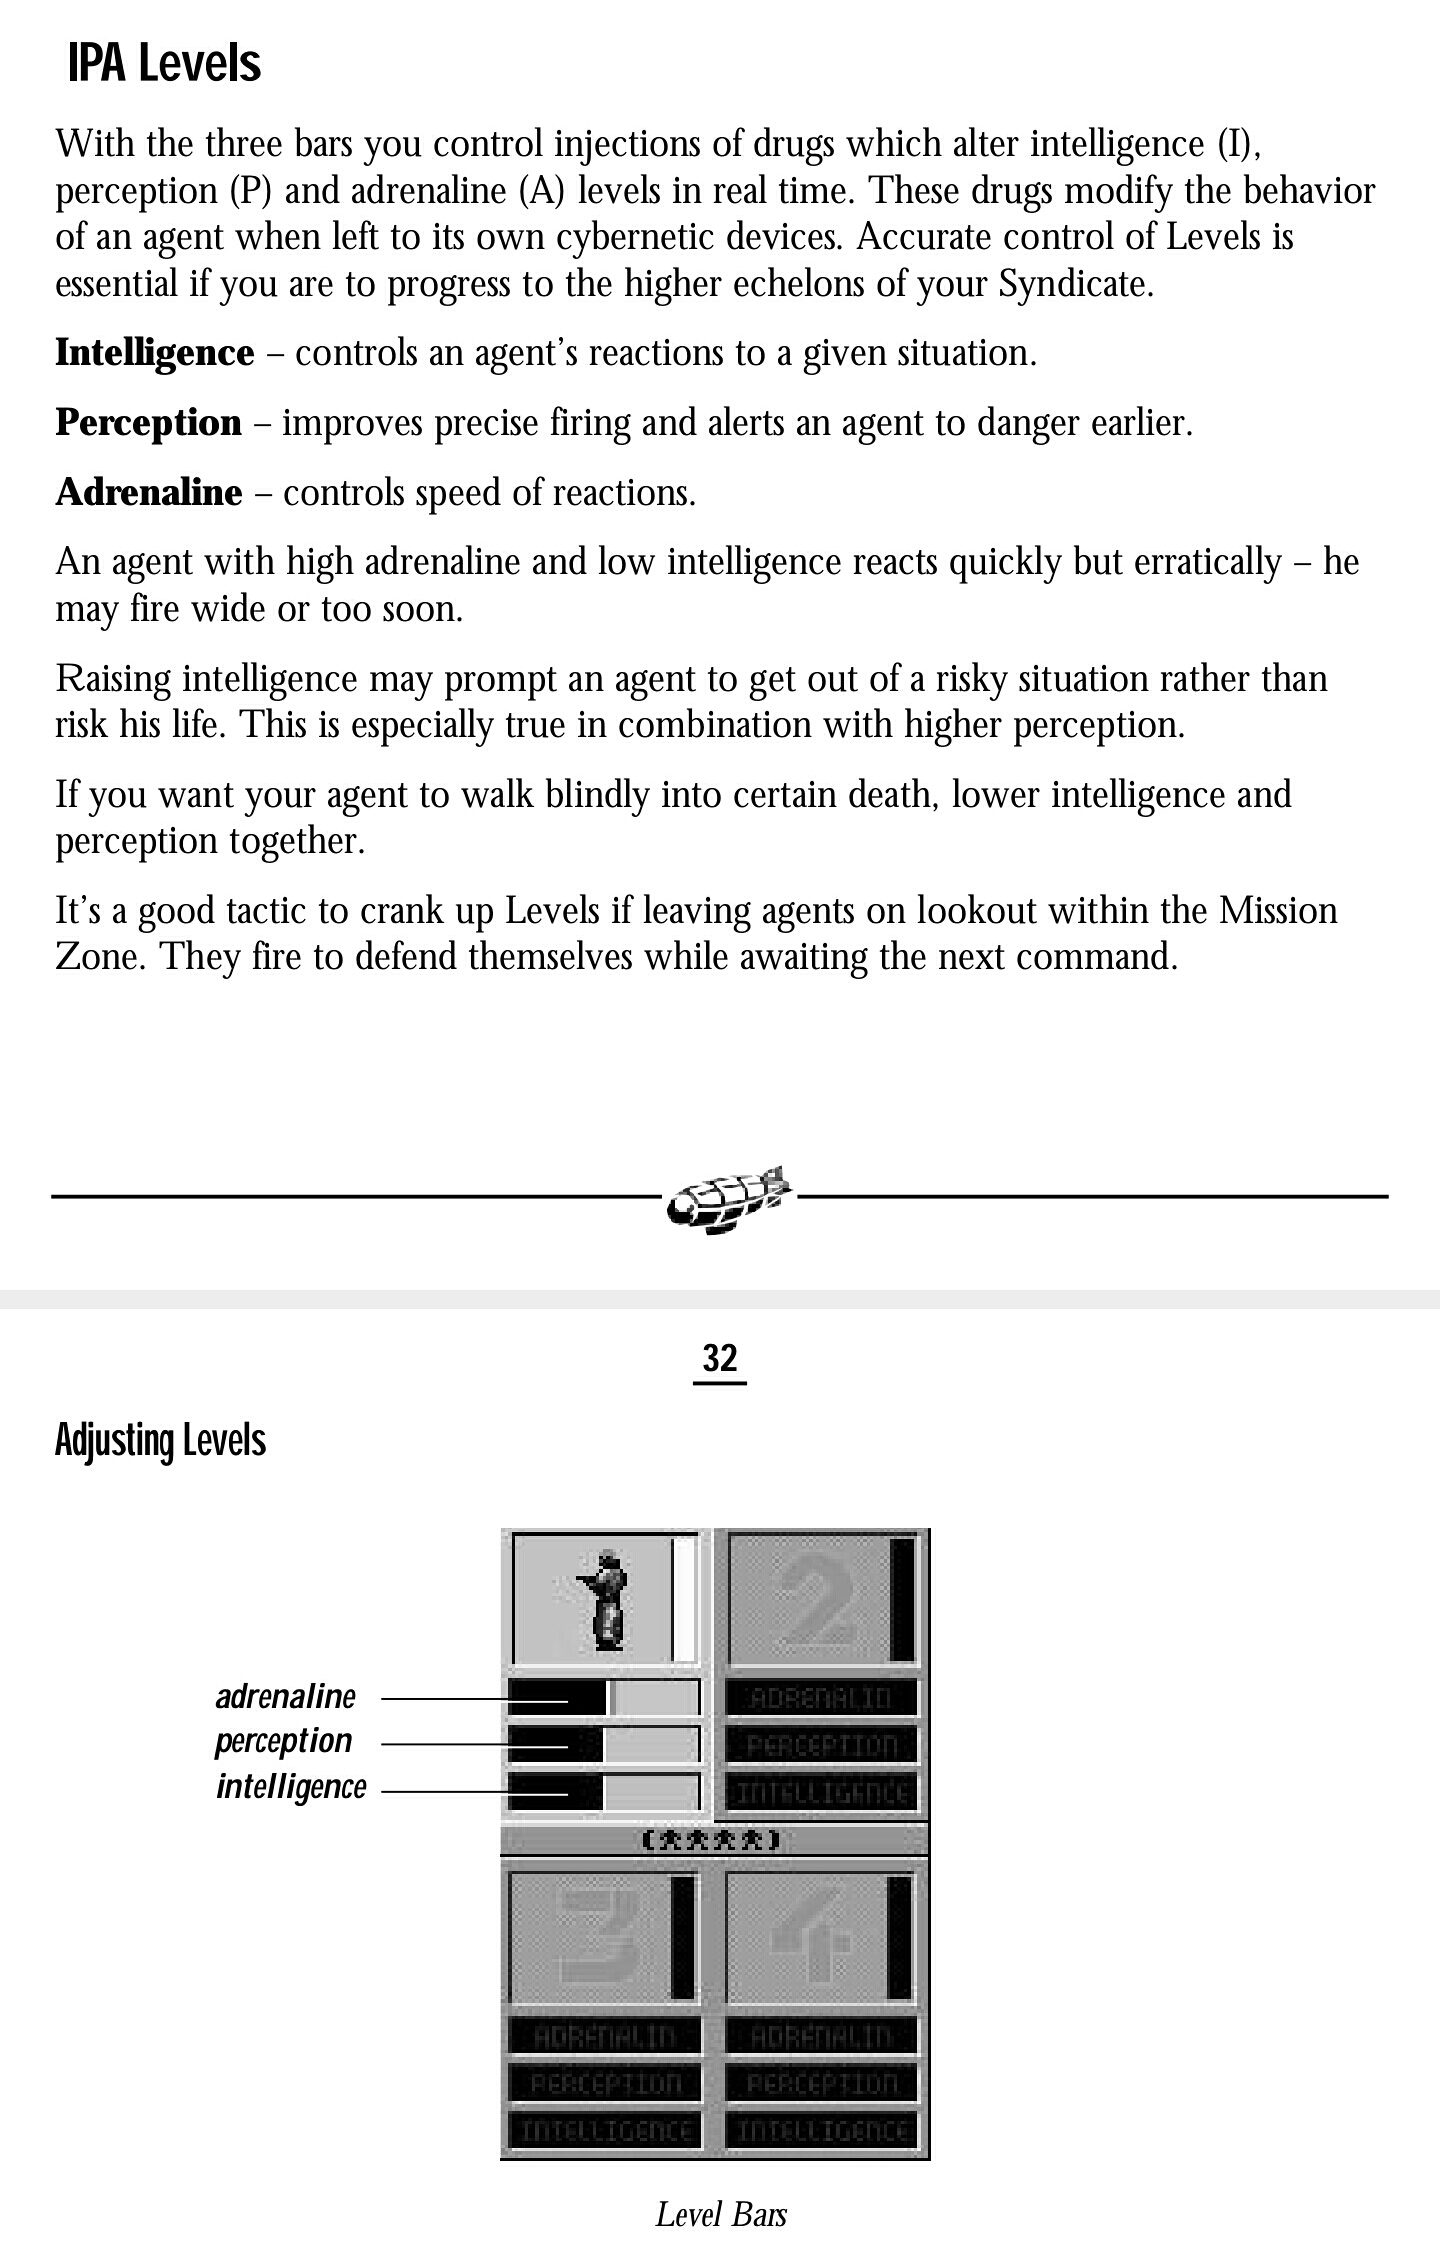
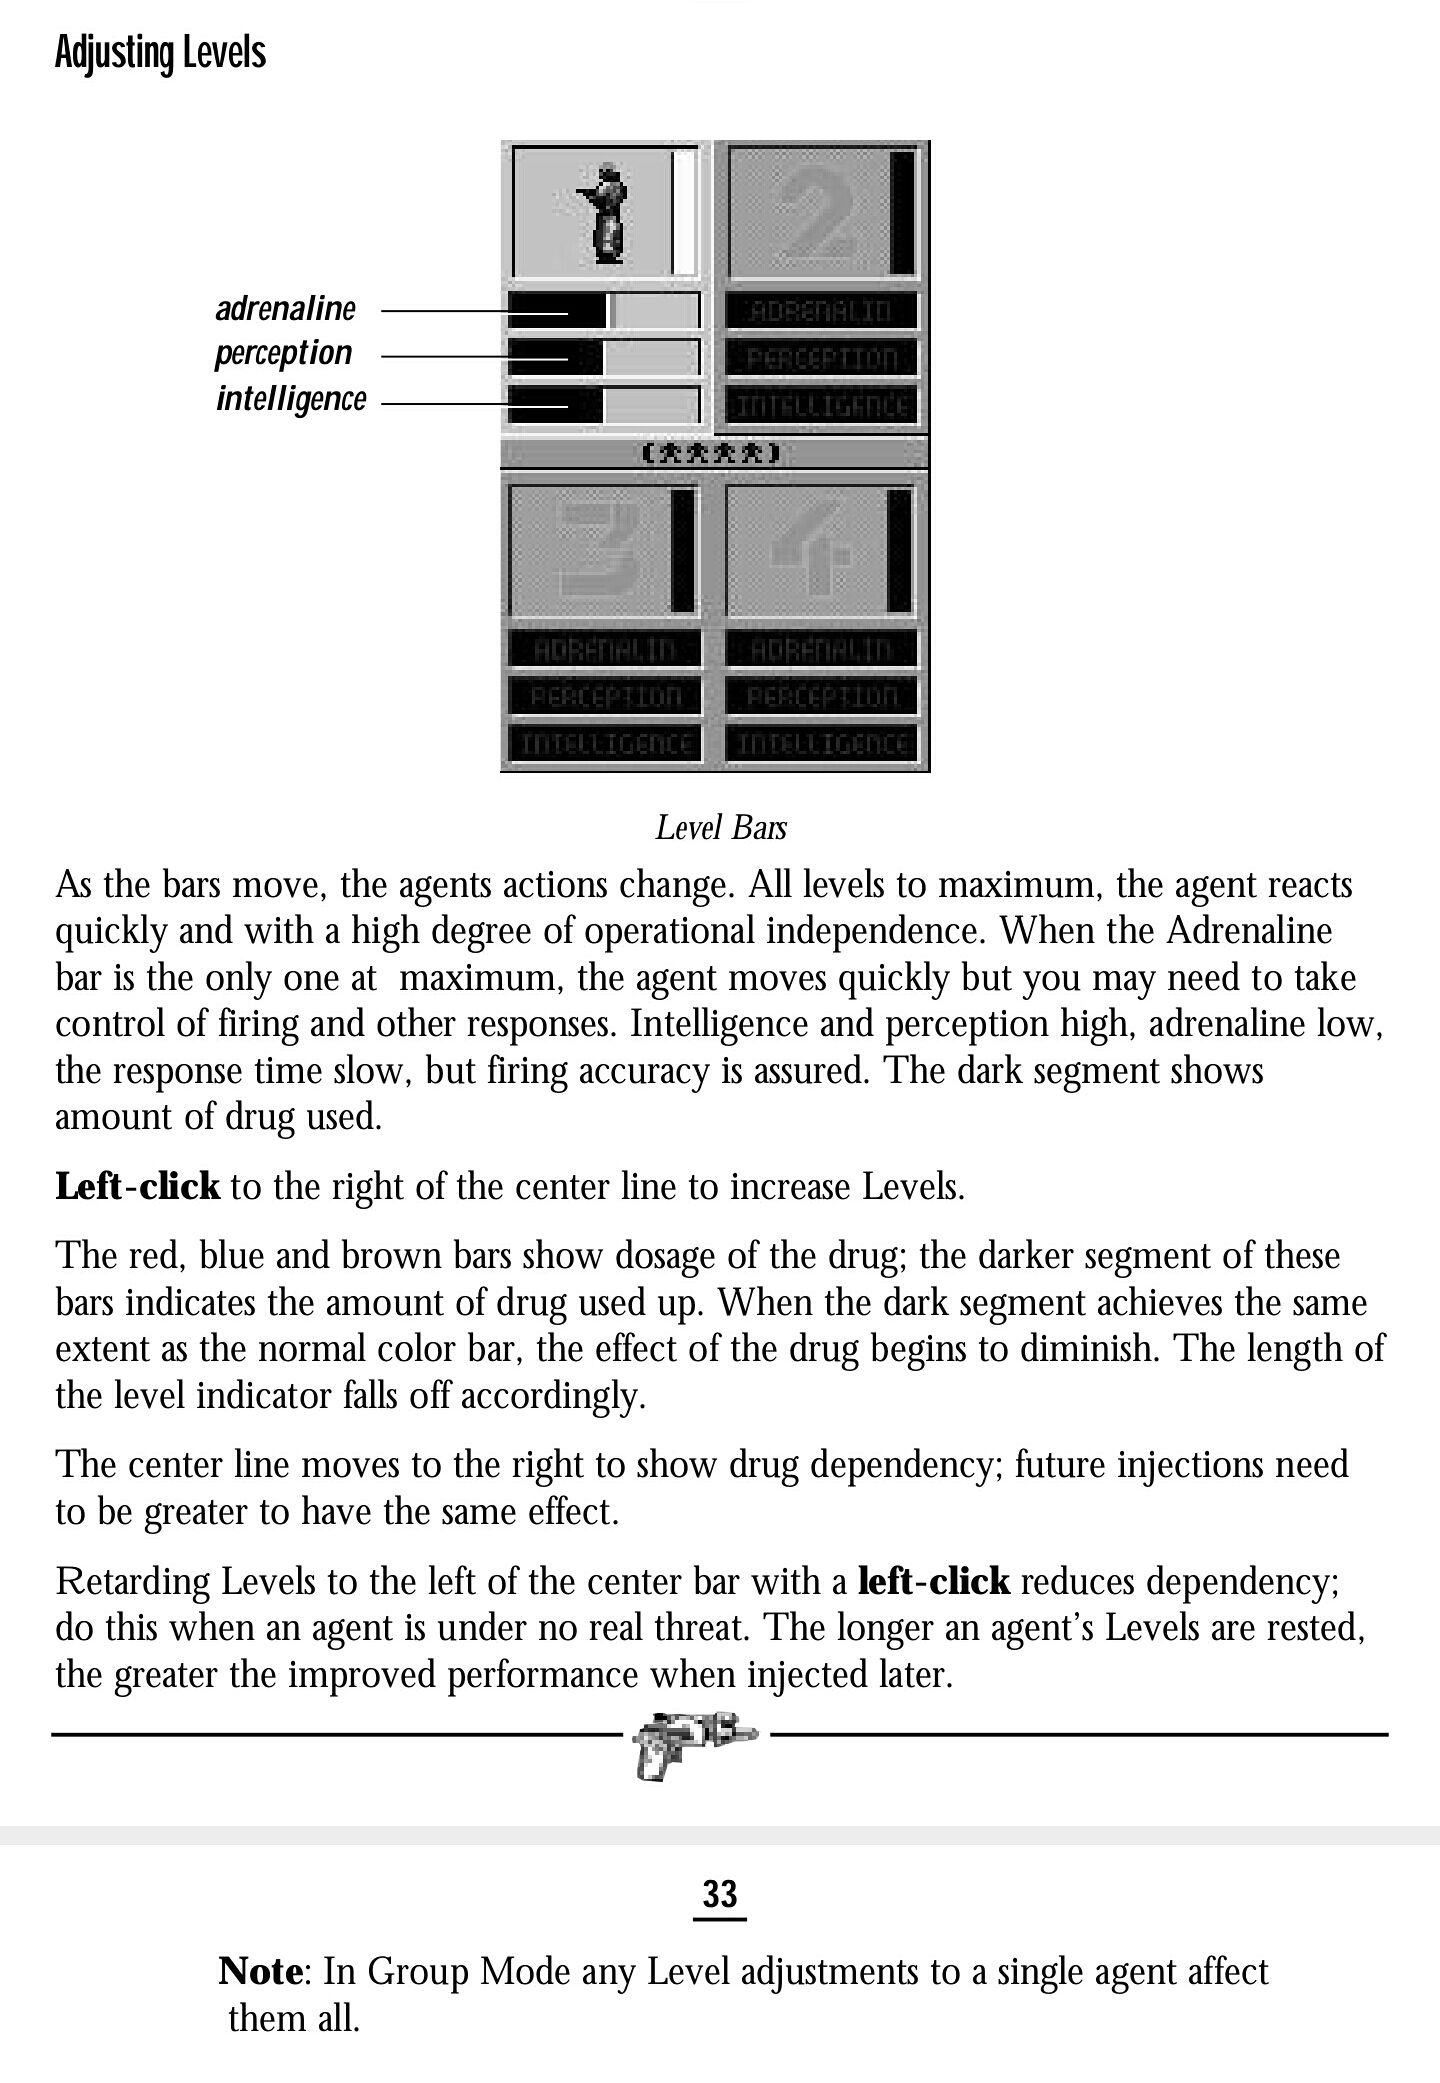
Agent behaviour / performance can be altered by adjusting their drug levels. This side of the game is very useful, but is often misunderstood, or largely ignored by players trying the game out. The manual explains the bars in more detail (see pics), but to explain them with their most obvious behaviour changes:Adrenaline (Red) —> Faster/slower movement
Perception (Blue) —> Higher/lower accuracy
Intelligence (Brown) —> Higher/lower initiativeHigh adrenaline: used most of the time, just to get around the map.
Low adrenaline can be worthwhile for increased health regen later (with V3 Chest).
High accuracy useful most of the time.
Low accuracy can be useful for covering fire.
High intelligence useful for guarding areas (agents will open fire on enemies by themselves).
Low intelligence useful for covert missions (agents will not fire unless you make them).Killer tip: Left + Right mouse buttons = Panic Mode. Maxes all drug levels.
Used in firefights. Essential tactic.However, the longer drugs are used (bar to right side), the higher the agents tolerance (white line), until the drug has little effect. If that drug is not needed, the tolerance line can be slowly brought back by moving the bar to the left side. Tolerence is controlled better with upgraded heart/brain mods.
Attachments:
April 28, 2021 at 1:36 pm #4412Notable Weapons/items:
Medikit – carry a couple per agent until you have V3 Chest (when health regenerates).
Minigun – most useful weapon in the game. Powerful, fast, loads of ammo. Once you have this weapon, the game really begins! 😉
Gauss Gun – rocket launcher, 3 shots. Note: If changing from Gauss to another weapon with all agents selected, make sure they all have the new selected weapon you want (or individually deselect their Gausses). Otherwise they will keep their Gauss Gun selected and with hilarious/messy results! As it’s so expensive and hard to keep safe, I’ll often only have one Guass-equipped agent selected when firing, or equip only one agent with rocketty goodness in the first place.
Laser: hugely expensive, only 5 shots. Vaporises enemies, and everything they drop. So on one hand, no timed bombs laying around blowing you up! On the other hand, no timed bombs to grab for the 25k! In tough later missions, it might be worth sacrificing this income for safety.
Flamer: short range, but fun if you like hearing the screams of burning enemies. Notable bc in this game, flames travel through walls! A graphical glitch maybe, but it can be a safe way to clear a building from the outside…
Energy Shield – gives invulnerablility, but can’t fire while equipped. Depletes over time but does recharge (slowly), if not empty. Can be alternated with a 2nd shield for constant protection, if timed right. But probably not worth the hassle.
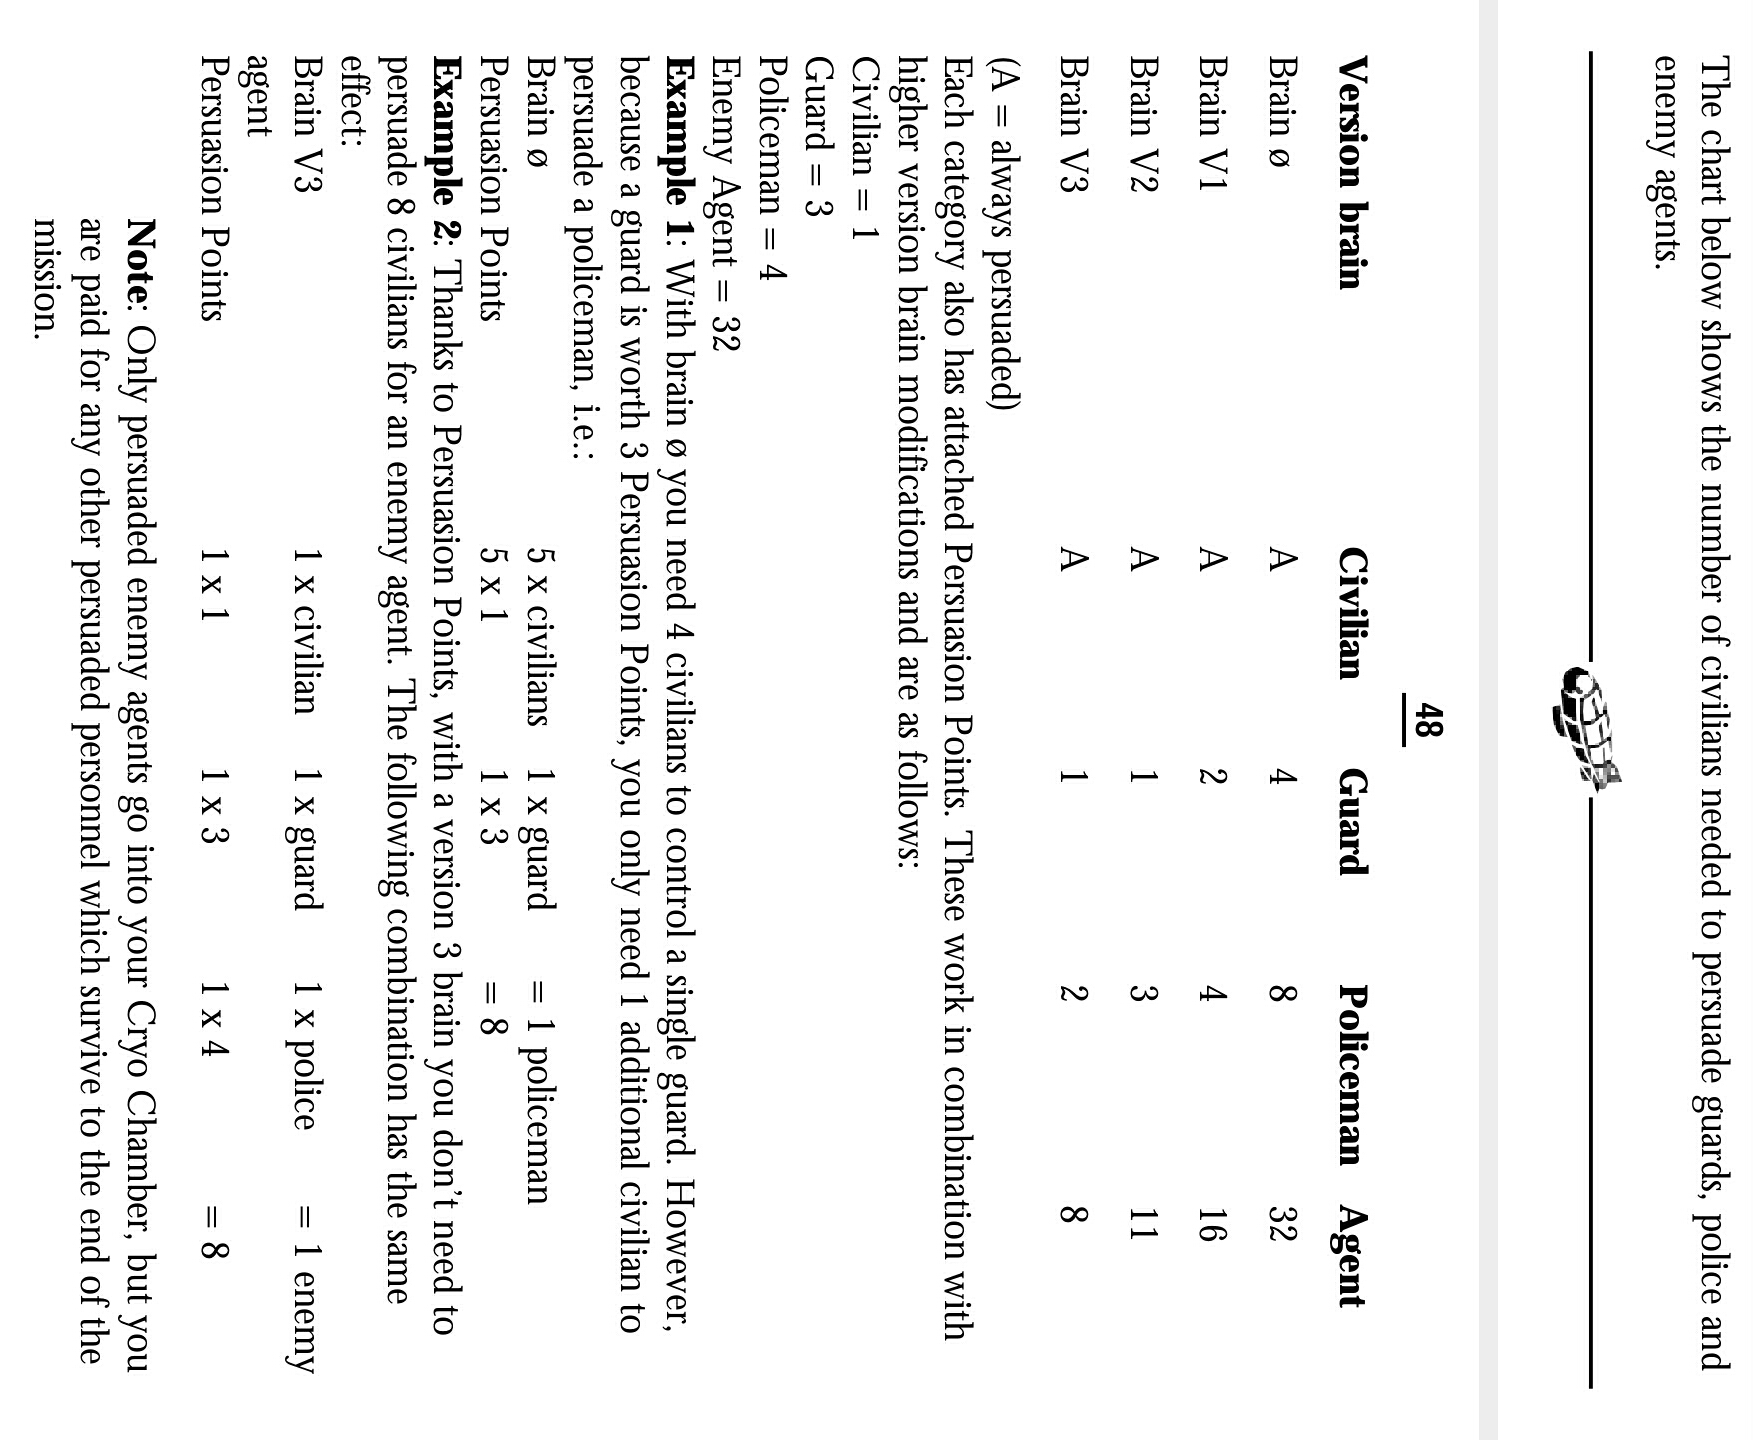
Persuadertron – iconic item. Essential in some missions. Persuade/capture individuals that come within range. Persuading power dependant on Brain version/number persuaded (see manual pic).
Civilians, Guards, Police and Enemy agents all have different difficulties to persuade, defined by how many you have already persuaded. This that means as the group increases in size it gets easier to persuade higher value individuals, like agents.A novel tactic on some missions is to quickly persuade everyone nearby, until you have a group large enough to persuade enemy agents. Then you can run around the map moping them up without ever firing a shot!
This is useful on missions with large waves of enemy agents.Attachments:
May 5, 2021 at 3:31 am #4443Hey Spoonboy! Thanks for the tips! I started the game tonight and got to the second mission. I have to rescue some scientists from a house. I blew away the 3 guards in front of it and walked in but the roof won’t go away so I can’t see how to grab them.
I pressed escape hoping for a menu to see the controls and it failed the mission for me 🙁 DON’T PRESS ESCAPE!
Can you help me figure out what to do next? Is there a way to see inside buildings or rescue scientists? I’d rather ask for help here than googling it or watching playthroughs.
May 10, 2021 at 8:48 am #4477Hi Shattered. Only just saw this so sorry for not responding sooner!
You’ve probably already worked this out, but it raises a good point I’d not mentioned before.
While you can aim your agents at the inside of each building from the main view screen and left-click to move them around, for precise targets you can also do this via the mini-map. Just left-click on the targets (white-ringed grey circles), and your agents will move to that point. Assuming your Persaudertron is equiped, the targets will be persuaded.
This can be a useful movement method, as buildings often obscure areas you move through during missions.
Also useful for getting all agents back inside the red ‘evacuate’ circle at the end – but the mission won’t complete until your persuaded targets join you there.
Hope this helps!
You must be logged in to reply to this topic.
Home › Forums › Previous Months › 57 – May 2021: Syndicate › Syndicate 101
